
Creating contentBeginner · about 10 minFree · no signup
100 ChatGPT photo shortcodes
From /fisheye to /golden hour: paste the legend once, upload a photo and combine shortcuts for your next edit.
By Alan Brown · Works with ChatGPT
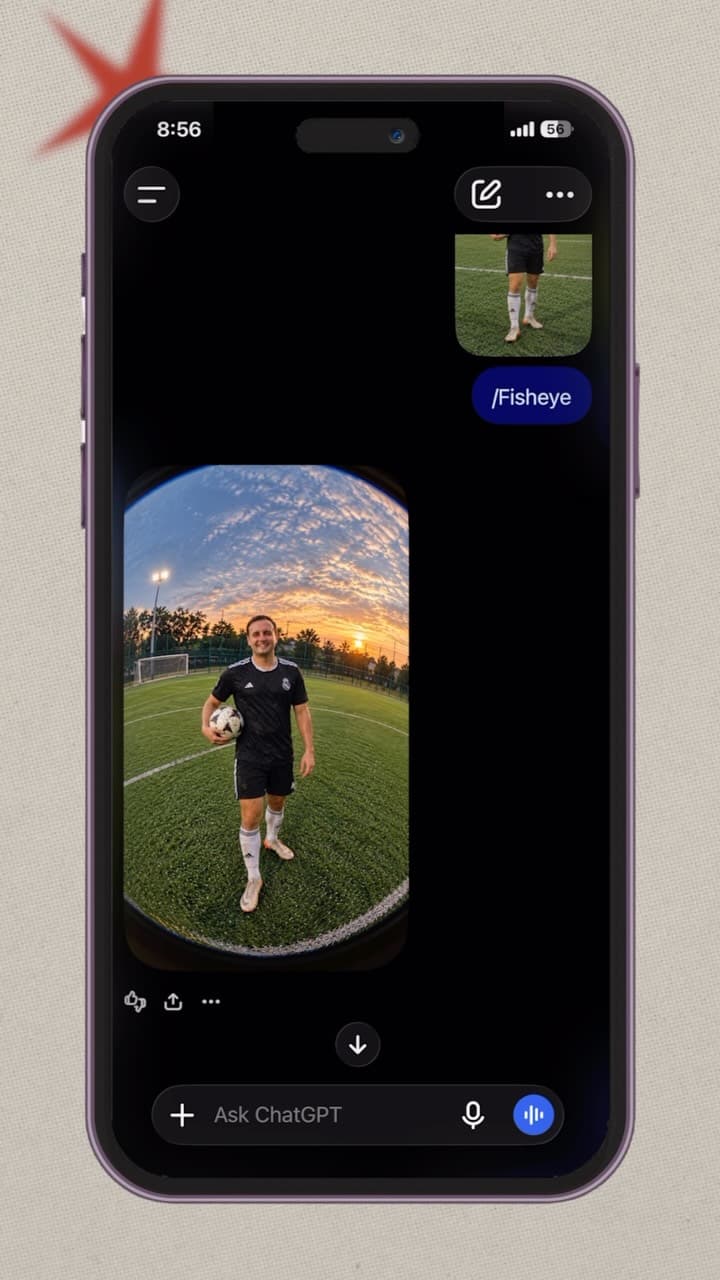
One photo can take many directions. This guide gives you 100 custom photo-editing shortcuts in 10 groups of 10, including the /fisheye look shown in the video.
- 1. Open ChatGPT at chatgpt.com/ and copy the full prompt below into a chat with image editing available. These shortcuts are a custom legend you teach the chat, not hidden or built-in commands. Availability and usage limits depend on your account and workspace.
- 2. Upload the photo you want to edit. Say which photo to use if you have uploaded several. Then send one code or a short combination. Capitalisation does not matter: /Fisheye and /fisheye mean the same thing in this legend.
- 3. Try: “Use this photo. /fisheye + /golden hour. Keep the person’s face, clothing and football unchanged.” This asks for a visual lens effect and warm light, with clear preservation instructions.
- 4. Try a portrait: “Use this photo. /headshot + /window light + /grey backdrop. Keep my facial features and natural skin texture.” Review the result for unintended changes.
- 5. Try a travel edit: “Use this photo. /after rain + /cool tone + /landscape crop. Keep the buildings and street layout unchanged.” Add only the effects that fit the scene.
- 6. The 100-code list covers lens and perspective; framing and composition; lighting; colour and tone; people and portraits; backgrounds and settings; weather and atmosphere; film and camera effects; detail and finish; and targeted edits and output.
- 7. Start with one or two compatible codes and refine the result. Opposing instructions such as /shallow focus and /deep focus need a choice. Camera terms describe a simulated appearance; a generated angle or restored detail is not evidence of what the original scene contained.
- 8. The setup instructions and all 100 definitions are included in “Copy full prompt”. If you copy only a category, include the setup instructions too. Paste the legend again when starting a new chat. Official image guidance: learn.chatgpt.com/docs/image-generation
Context & limitations
These 100 definitions were written for this guide. For product-specific setups, see 270 ChatGPT shortcodes for product photos.
Do this yourself
LENS & PERSPECTIVE
/fisheye — Simulate a very wide fisheye lens with curved edges and a centred subject. /wide angle — Show more of the surroundings with a wide-angle photographic look. /telephoto — Use a compressed perspective and a softly blurred distant background. /macro — Create a close-up that emphasises the subject’s smallest visible details. /portrait lens — Use an 85mm-style portrait look with natural facial proportions. /tilt shift — Create a miniature-scene effect with a narrow band of sharp focus. /low angle — Reframe from below the subject for a taller, more imposing perspective. /high angle — Reframe from above the subject while keeping its proportions believable. /overhead — Show the scene directly from above as a flat-lay photograph. /eye level — Place the camera at the subject’s eye level for a natural viewpoint.FRAMING & COMPOSITION
/close crop — Crop tightly around the main subject without cutting off key features. /half body — Frame the person from roughly the waist up, with space around the head. /full body — Show the person from head to toe with natural body proportions. /environmental — Make the subject’s surroundings an important part of the composition. /rule of thirds — Place the main subject near a thirds intersection. /centred — Centre the subject with balanced space on both sides. /symmetry — Arrange the surrounding composition with strong visual symmetry. /negative space — Leave generous uncluttered space around the subject. /leading lines — Use existing paths, edges or architecture to guide attention to the subject. /frame within frame — Compose the subject through a doorway, window or other foreground frame.LIGHTING
/golden hour — Add low, warm sunlight with long, soft-edged shadows. /blue hour — Use cool twilight tones with gentle ambient light. /window light — Light the subject softly from a large window on one side. /softbox — Use broad, diffused studio light with gentle shadows. /hard light — Use a small direct light source with crisp, defined shadows. /rim light — Add a narrow light outline that separates the subject from the background. /backlit — Place the main light behind the subject with believable glow and contrast. /rembrandt — Use portrait lighting that creates a small triangle of light on the shadowed cheek. /butterfly — Place the portrait light above and in front for a small shadow beneath the nose. /neon light — Light the scene with coloured neon accents and consistent reflections.COLOUR & TONE
/true colour — Use restrained, natural colours and neutral skin tones. /warm tone — Shift the overall colour balance gently toward warm amber. /cool tone — Shift the overall colour balance gently toward cool blue. /black and white — Convert to monochrome with distinct highlight, midtone and shadow detail. /high contrast — Increase tonal separation while retaining important detail. /soft contrast — Reduce harsh tonal transitions for a gentle photographic finish. /muted palette — Lower saturation for understated, coordinated colours. /pastel — Use a light pastel palette while keeping the subject recognisable. /earth tones — Emphasise warm browns, olive greens and natural neutral colours. /teal amber — Use restrained teal shadows and amber highlights without unnatural skin colour.PEOPLE & PORTRAITS
/headshot — Create a clean professional headshot with relaxed expression and simple framing. /editorial portrait — Create a magazine-style portrait with deliberate pose and lighting, without added text. /candid portrait — Give the portrait a relaxed, unposed feeling without changing who the person is. /environmental portrait — Show the person naturally within the supplied workplace or setting. /studio portrait — Place the person against a simple studio backdrop with controlled lighting. /outdoor portrait — Use a softly separated outdoor setting with natural daylight. /natural skin — Retain realistic skin texture and the person’s distinguishing features. /clean portrait — Reduce temporary blemishes lightly while keeping natural texture and facial structure. /group balance — Balance the exposure across a group while preserving every person and expression. /eye focus — Emphasise focus on the eyes without changing their shape or colour.BACKGROUNDS & SETTINGS
/white backdrop — Replace the background with clean white and a believable contact shadow. /black backdrop — Replace the background with deep black and controlled subject separation. /grey backdrop — Use a neutral grey studio background. /colour backdrop — Use a single-colour studio background; ask which colour if none is specified. /gradient backdrop — Use a subtle gradient background that complements the subject. /city street — Place the subject on a believable city street with matching perspective and light. /cafe scene — Place the subject in a warm cafe setting with realistic furniture scale. /forest setting — Place the subject among trees with filtered daylight and grounded shadows. /beach setting — Place the subject by the sea with plausible light, horizon and contact shadows. /rooftop setting — Place the subject on a rooftop with a distant skyline and matching perspective.WEATHER & ATMOSPHERE
/overcast — Use soft cloud-filtered daylight with low shadow contrast. /light rain — Add light rain and plausible wet surfaces without hiding the subject. /after rain — Show damp surfaces and subtle reflections after rainfall. /morning mist — Add a thin layer of morning mist with natural depth falloff. /foggy — Add denser fog while keeping the main subject readable. /snowfall — Add falling snow with depth variation and lighting that matches the scene. /autumn — Shift suitable surrounding foliage toward believable autumn colours. /spring — Add a fresh spring atmosphere with soft light and restrained seasonal foliage. /sun rays — Add visible shafts of sunlight where openings and haze make them plausible. /dust light — Add subtle illuminated dust motes in a beam of indoor light.FILM & CAMERA EFFECTS
/film grain — Add fine, restrained photographic grain without obscuring detail. /instant print — Give the image an instant-film look with a simple white print border. /disposable camera — Simulate a casual film-camera snapshot with modest grain and direct flash. /direct flash — Use on-camera flash with bright foreground detail and stronger background shadows. /vintage fade — Add gently faded colours and softened blacks, without changing the subject. /cinematic still — Use deliberate framing and restrained cinematic colour grading. /long exposure — Simulate motion trails in moving elements while keeping stationary objects sharp. /motion pan — Keep the moving subject relatively sharp with directional background blur. /shallow focus — Keep the subject sharp with gradual, believable background defocus. /deep focus — Keep foreground, subject and background visually sharp where plausible.DETAIL & FINISH
/exposure balance — Balance bright and dark areas for a readable overall exposure. /white balance — Correct an unwanted colour cast while preserving the scene’s mood. /shadow lift — Lighten dark areas moderately without making the image flat. /highlight soften — Soften harsh bright areas; do not claim to recover missing original detail. /noise reduce — Reduce distracting image noise while retaining texture. /subtle sharpen — Add restrained edge clarity without halos or crunchy skin texture. /texture detail — Emphasise visible surface texture without inventing factual markings. /lens straighten — Reduce apparent lens distortion and straighten bent architectural lines. /horizon level — Straighten the horizon while preserving as much of the original frame as possible. /restore gently — Reduce scratches and fading in an old photo; label reconstructed details as inferred.TARGETED EDITS & OUTPUT
/remove distraction — Remove the object I identify and fill its area consistently with the surroundings. /background blur — Blur only the background, keeping subject edges and hair believable. /keep subject — Preserve the main subject’s appearance, pose and clothing while applying requested edits elsewhere. /change outfit colour — Change only the garment colour I specify, retaining its cut, texture and folds. /extend frame — Generate additional surroundings beyond the existing frame; treat the new area as invented. /square crop — Compose a square crop that keeps the main subject intact. /portrait crop — Compose a 4:5 portrait crop suitable for a feed post. /story crop — Compose a 9:16 vertical crop, keeping important details away from the outer edges. /landscape crop — Compose a 16:9 horizontal crop that preserves the main subject. /copy space — Leave a clean area in the position I specify for text to be added later; add no text now.Short, defined instructions make edits easy to repeat while stating what should change and what should stay the same.
Want to build this with a teacher?
Pathwise Academy runs small, hands-on AI classes in Singapore for ages 10–17 and adults.